











How to Remove People from Photos Without Ruining the Background
A stranger walks into the frame just as you capture the perfect vacation photo. A passerby appears behind a family portrait. Someone's arm, suitcase, or shadow distracts from an otherwise excellent shot.
You can remove people from a photo with an AI object-removal tool, but the quality of the result depends on more than pressing an erase button. The tool must understand which pixels belong to the unwanted person, which details belong to the main subject, and what should appear in the empty space afterward.
The safest workflow is simple: start with the best available source image, select one unwanted person at a time, include connected shadows and objects, and inspect the repaired background before downloading.
Quick answer: Upload the original image to an AI people remover, select the unwanted person completely, include their shadow or carried items, process one person at a time, and check the result at full size. If the background contains railings, tiles, text, hands, or faces, use a smaller mask and make several controlled passes.
Why Removing a Person Can Damage the Background
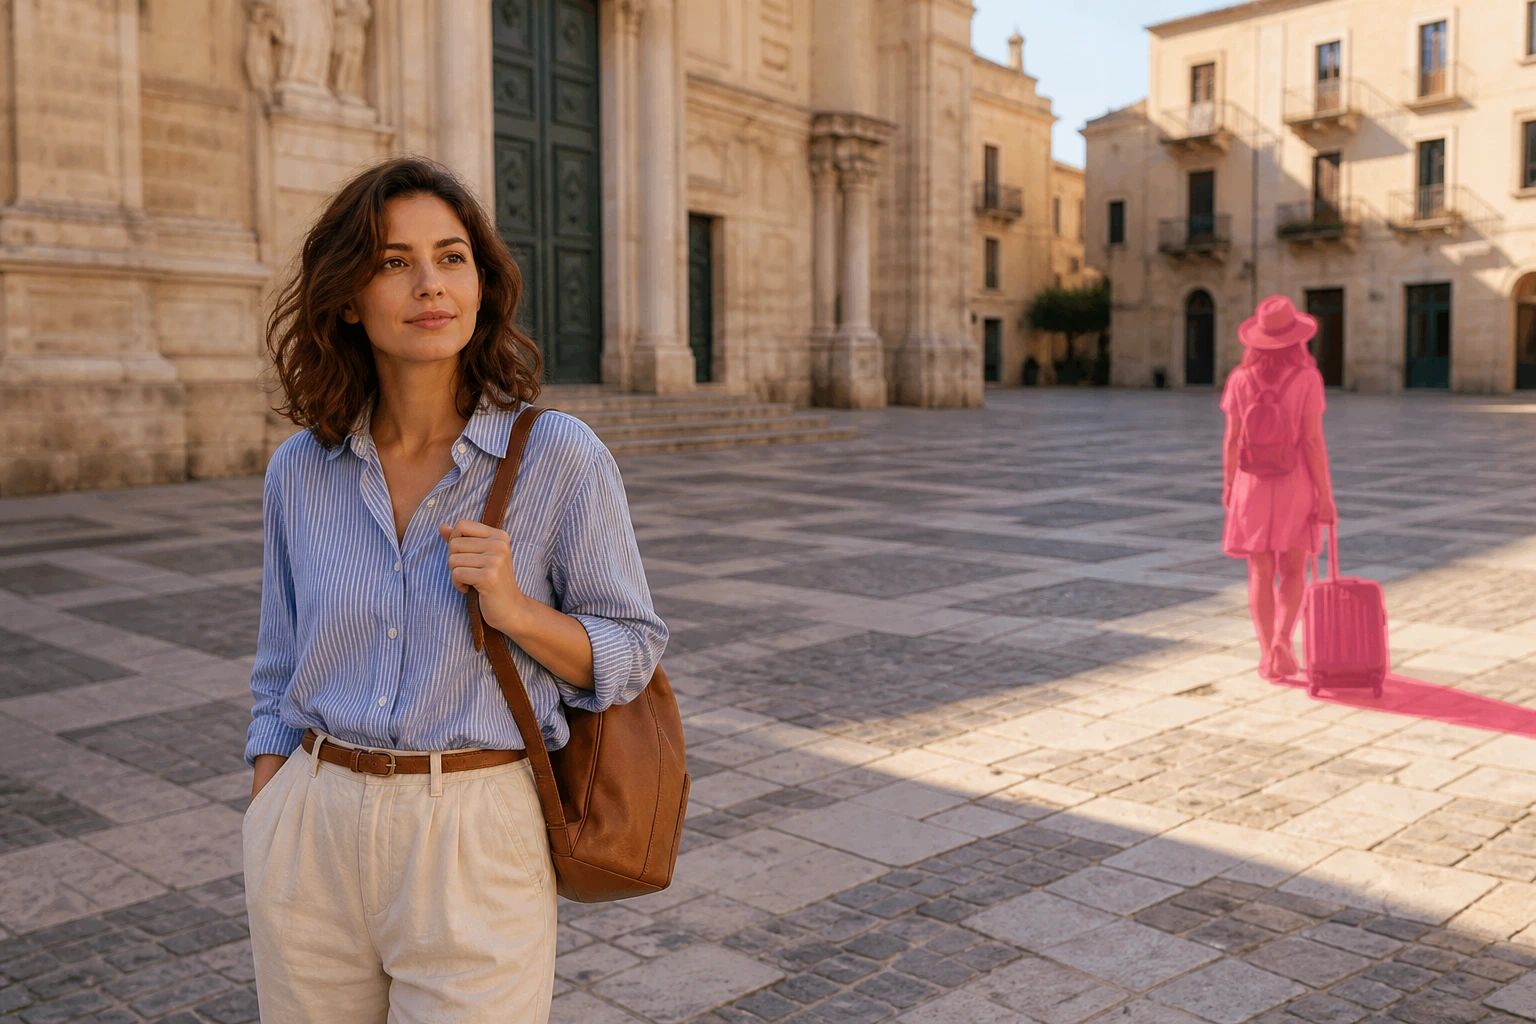
An AI removal tool does not uncover a hidden version of the scene. If a person is standing in front of a wall, the pixels behind that person were never captured by the camera. The tool has to reconstruct a plausible continuation using nearby visual information.
That task is easy when the subject stands against open sky, grass, sand, or a softly blurred background. It becomes harder when the missing area contains:
- Brickwork, tiles, railings, or repeating patterns
- Architectural edges and straight lines
- Reflections, water, glass, or mirrors
- Text, signs, logos, or license plates
- Another person's face, hand, clothing, or hair
- Strong shadows that connect the person to the ground
- Unique objects with no visible matching reference nearby
A clean result depends on giving the AI enough context to rebuild the scene while protecting everything you want to keep.
Before You Edit: Choose the Best Source Photo
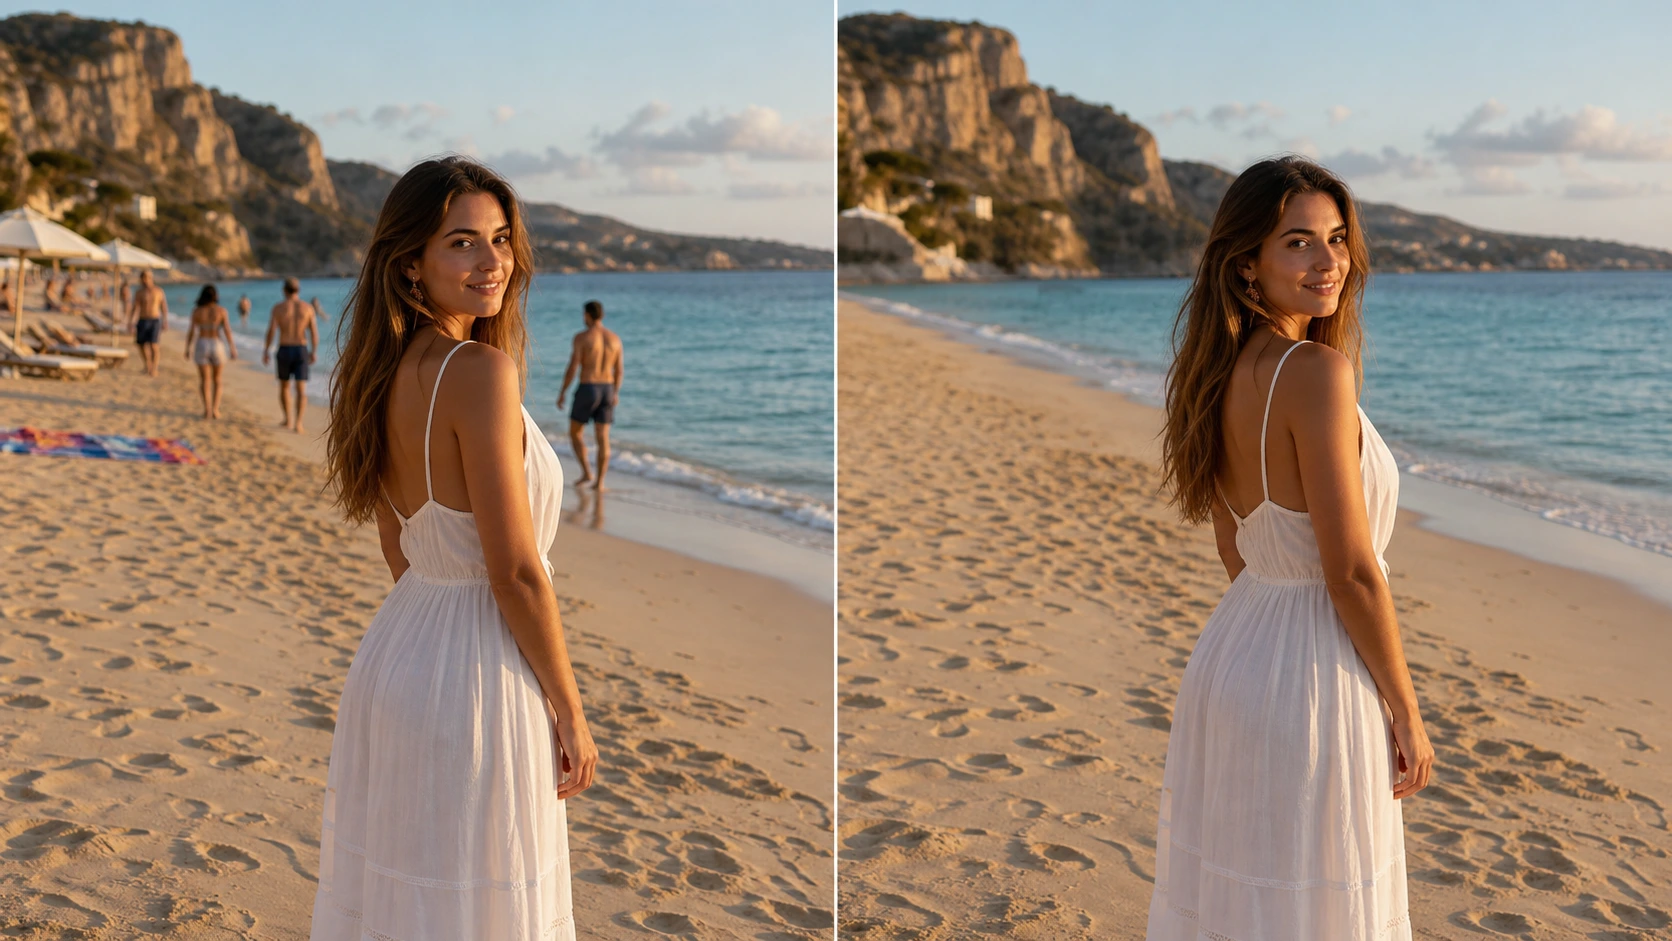
Starting with the right image often matters more than the tool setting.
Use the original file when possible
Avoid beginning with a screenshot, compressed message attachment, or image downloaded repeatedly from social media. Compression removes small textures and edge information that the AI could otherwise use to reconstruct the background.
If the only available version is small, keep it at its original size during removal. Upscaling first can make compression blocks and artificial edges more prominent. Clean the scene first, then enlarge the final image if needed.
Check nearby frames
If you took several photos or used burst mode, compare them before editing. Another frame may contain fewer people or reveal the part of the background currently blocked. Choosing the cleanest frame reduces the amount of reconstruction required.
Save an untouched copy
Always preserve the original. Adobe's official tutorial on removing tourists with the Remove tool recommends working non-destructively so the source remains available for comparison or correction. Even when using an online workflow, download the edited result as a new file rather than replacing the original.
How to Remove People from a Photo in 5 Steps
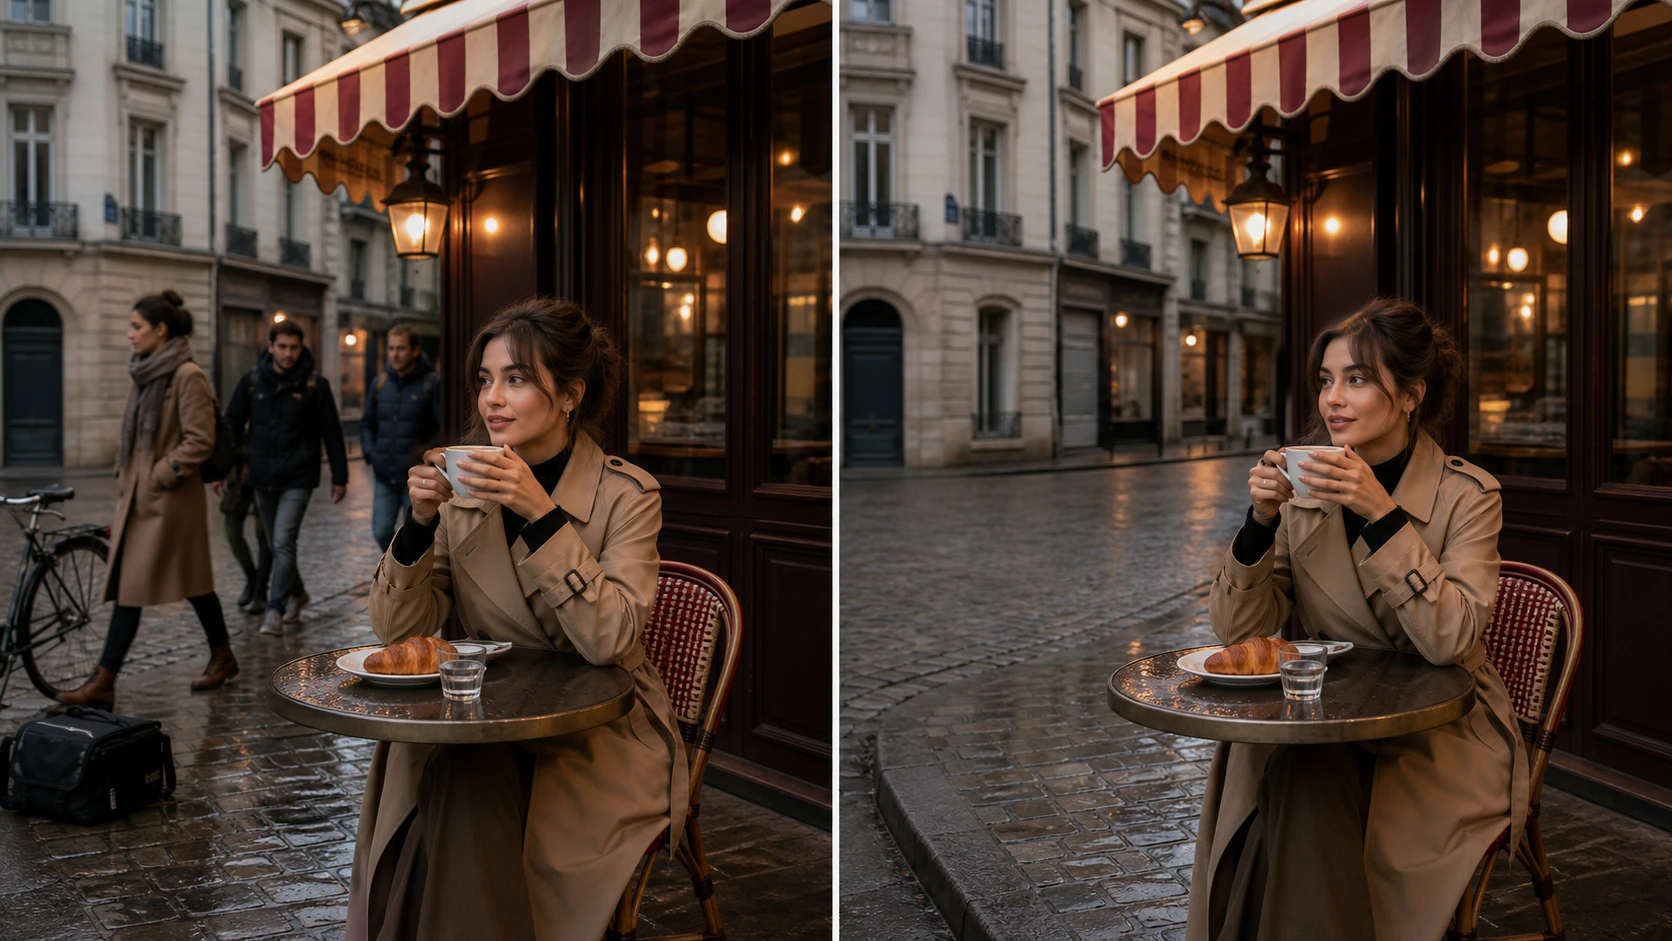
The following workflow uses EzEnhancer Magic Eraser, a browser-based tool with dedicated modes for people, objects, text, and authorized watermark cleanup.
1. Upload the highest-quality version
Open Magic Eraser and upload a JPG, PNG, or WebP image. Keep enough of the surrounding scene in the frame. A tight crop may remove the wall, pavement, foliage, or sky that the model needs as reconstruction context.
Do not crop until after the removal unless cropping alone can eliminate the unwanted person.
2. Choose People mode
Select People when removing a passerby, tourist, photobomber, or isolated background figure. This provides clearer context than treating every edit as a generic object-removal task.
Use the standard object mode for attached equipment or scene clutter that should be removed separately, such as a suitcase, sign, cable, or rubbish bin.
3. Brush over the complete person
Cover the full figure, including:
- Hair and loose clothing
- Hands, feet, and partly hidden limbs
- Bags, umbrellas, hats, or objects they are carrying
- Any shadow or reflection that clearly belongs to them
- A narrow margin around the outside edge
An incomplete mask often leaves floating shoes, fragments of clothing, duplicate limbs, or a person-shaped shadow. However, an oversized mask can erase useful background information or overlap the main subject. Aim for complete but controlled coverage.
4. Remove one person at a time
When several people are far apart, process them in separate passes. Each removal then has more untouched background available for reference.
This approach is especially important for patterned floors, fences, windows, stairs, and architecture. Removing an entire crowd in one large selection asks the model to invent too much of the scene at once.
If two people overlap, start with the person farthest from the main subject. Inspect the result, then create a smaller selection for the second person.
5. Inspect, refine, and download
Compare the before and after versions at full size. Look beyond the empty space where the person used to be. Check nearby faces, fingers, tattoos, accessories, pavement lines, windows, and shadows.
If one area looks wrong, undo the result and try a smaller mask. Do not repeatedly process the entire image when only one corner needs refinement.
Once the background looks natural, download the cleaned result in the format that suits its destination.
How to Protect the Main Subject
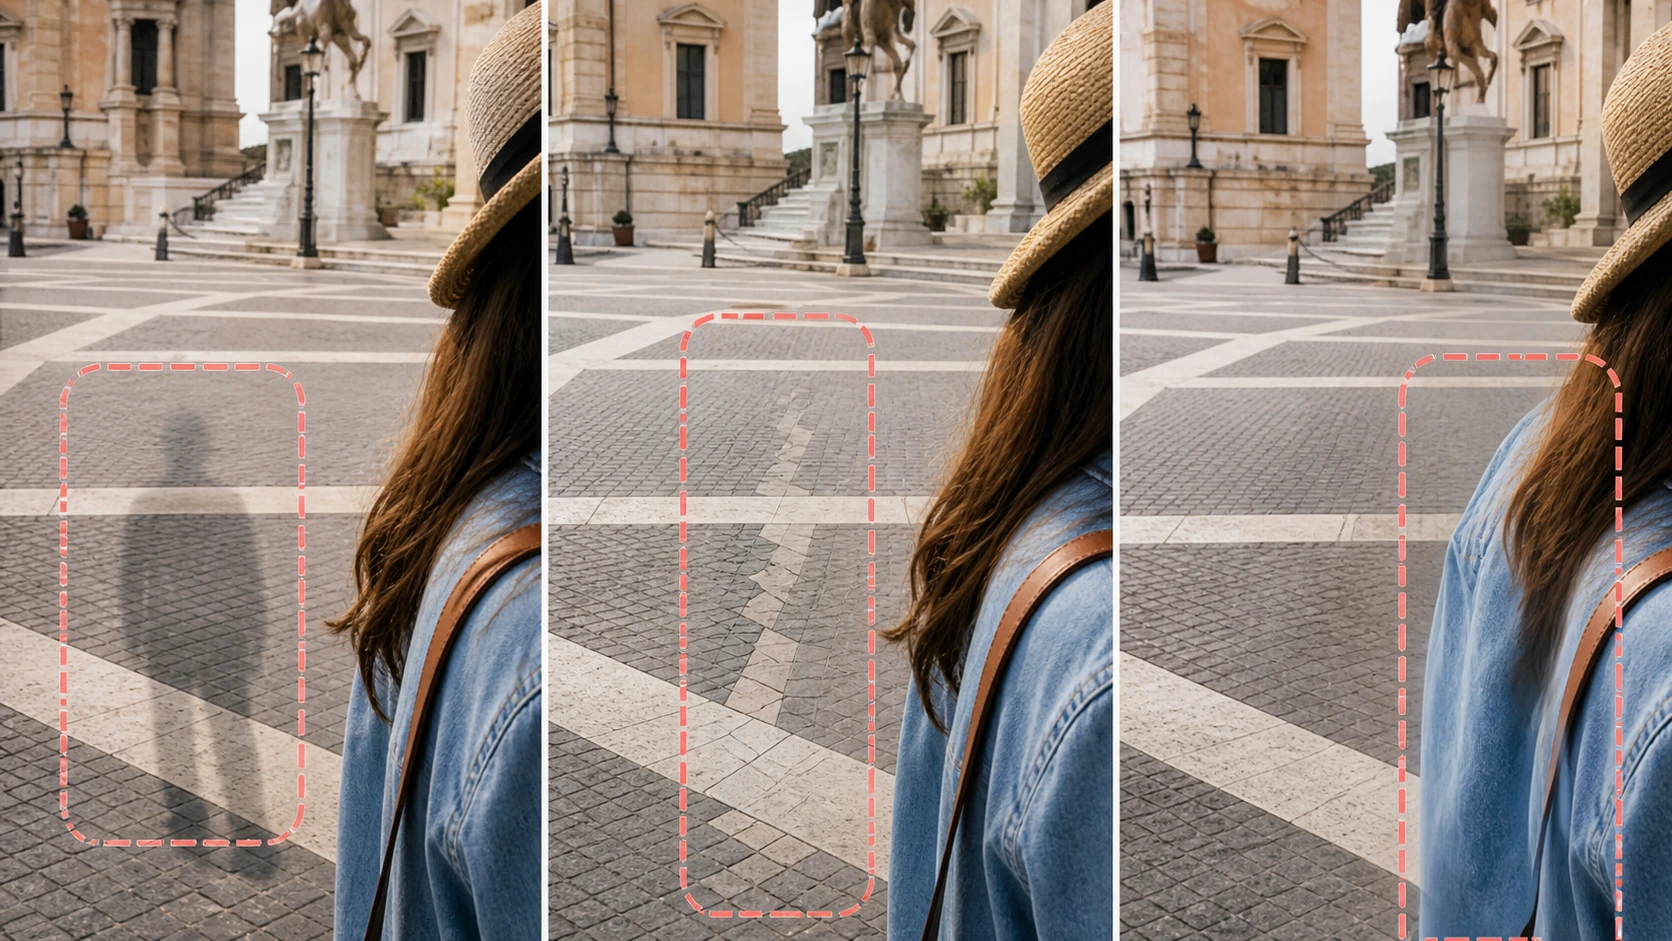
The most noticeable AI editing failures often appear next to the removed person rather than inside the reconstructed background.
Keep the mask away from faces and hands
If the unwanted person overlaps your subject's hair, face, fingers, or clothing, zoom in and use the smallest practical brush. It is better to make two careful passes than one broad selection that crosses an important edge.
When the overlap is severe, automatic removal may not be the right method. A manual editor can isolate the subject on a separate layer and rebuild the missing edge more precisely.
Protect tattoos, jewelry, and clothing patterns
Small identity details can resemble background texture to an AI model. If an unwanted arm crosses a tattoo or patterned shirt, select only the pixels that clearly belong to the unwanted person.
After processing, compare those details with the original rather than judging only the overall image.
Include connected shadows—but not unrelated ones
A person may disappear while their shadow remains on the pavement. Include the shadow when it is clearly connected to the person. If several shadows overlap, remove the figure first and treat the remaining shadow as a separate, smaller edit.
Common Problems and How to Fix Them
| Problem | Likely cause | Better approach |
|---|---|---|
| Blurry smear where the person stood | The mask was too large or the background lacked context | Use a tighter selection and remove one person at a time |
| Floating shoe, hand, or bag | Part of the person was missed | Include every connected item and a narrow edge margin |
| Broken tiles, rails, or horizon lines | The person covered a repeating geometric pattern | Make smaller passes and preserve visible lines around the mask |
| Main subject's face or tattoo changed | The mask overlapped identity details | Undo, zoom in, and keep the brush away from the subject |
| Person removed but shadow remains | The shadow was outside the selection | Remove the shadow in a second controlled pass |
| Repeated or duplicated textures | Too much area was regenerated at once | Reduce the selection and use more untouched background as context |
| Result looks softer than the original | The source image was compressed or low resolution | Finish cleanup first, then use an image enhancer or upscaler |
When Cropping Is Better Than AI Removal
AI is not always necessary. Cropping may produce a cleaner, more truthful result when the unwanted person is close to an outer edge and removing them does not disturb the composition.
Choose cropping when:
- The distraction sits near the top, bottom, or side of the frame
- The main subject remains balanced after reframing
- The image has enough resolution for the intended output
- The unwanted person overlaps a complex object that would be difficult to reconstruct
The EzEnhancer Image Cropper supports common aspect ratios and runs locally in the browser. Decide whether the image is for a social post, wallpaper, print, or thumbnail before choosing the crop.
When Manual Editing Is the Safer Choice
Use Photoshop, another layer-based editor, or a professional retoucher when:
- A person covers a large part of the main subject
- The missing area contains readable text or a unique artwork
- Multiple faces and hands overlap
- The image is intended for commercial printing at a large size
- Exact documentary accuracy matters
- AI repeatedly changes identity details
A manual workflow takes longer, but cloning, layer masks, and compositing from another frame offer more control over what is preserved.
Best Workflow for Different Photo Types
Travel and landmark photos
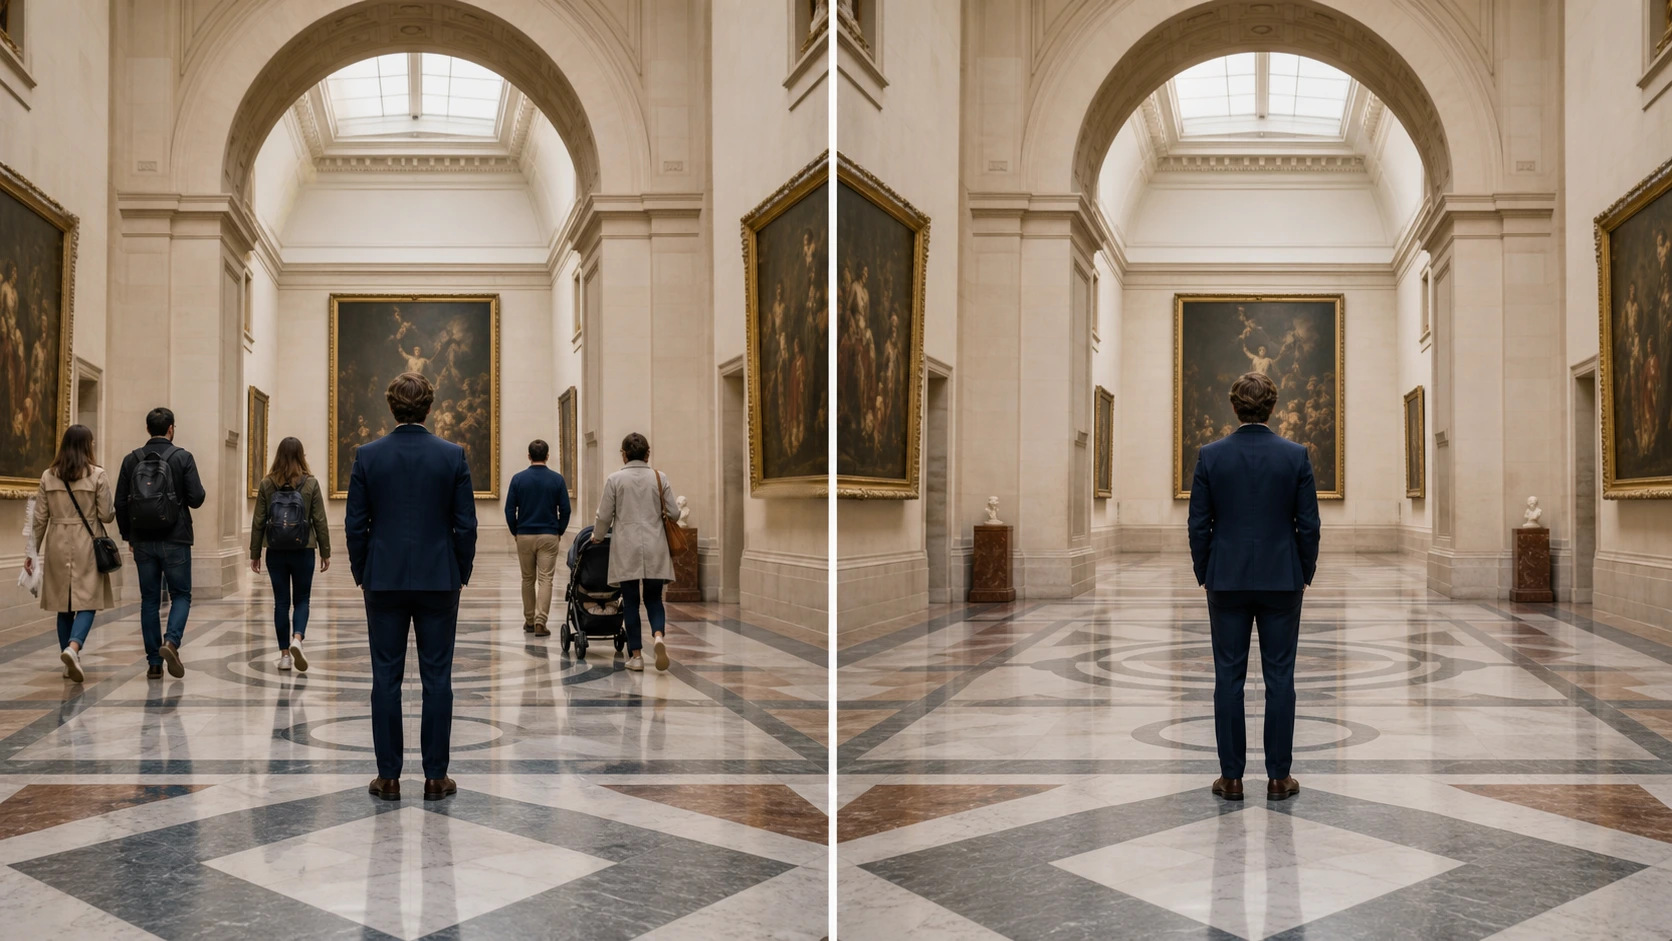
Start with isolated people against sky, water, open pavement, or simple walls. Remove distant tourists one at a time before working on anyone close to the main subject. Check architecture for bent columns, broken windows, and interrupted tile lines.
Group photos
Removing one person from a tightly packed group is difficult because shoulders, arms, hair, and shadows overlap. Use a small mask and accept that manual refinement may be necessary. Never use the edit to imply a false record of an event.
Property and interior photos
Vacuum cleaners, cables, bins, and incidental people can often be removed cleanly. Pay particular attention to floorboards, rugs, mirrors, and window reflections. Straight edges should continue naturally through the repaired area.
Product and creator photos
Remove background people, production equipment, tape, or temporary props only when you own or are authorized to edit the image. Preserve the shape, label, material, and shadow of the featured product.
How EzEnhancer Fits the Cleanup Workflow
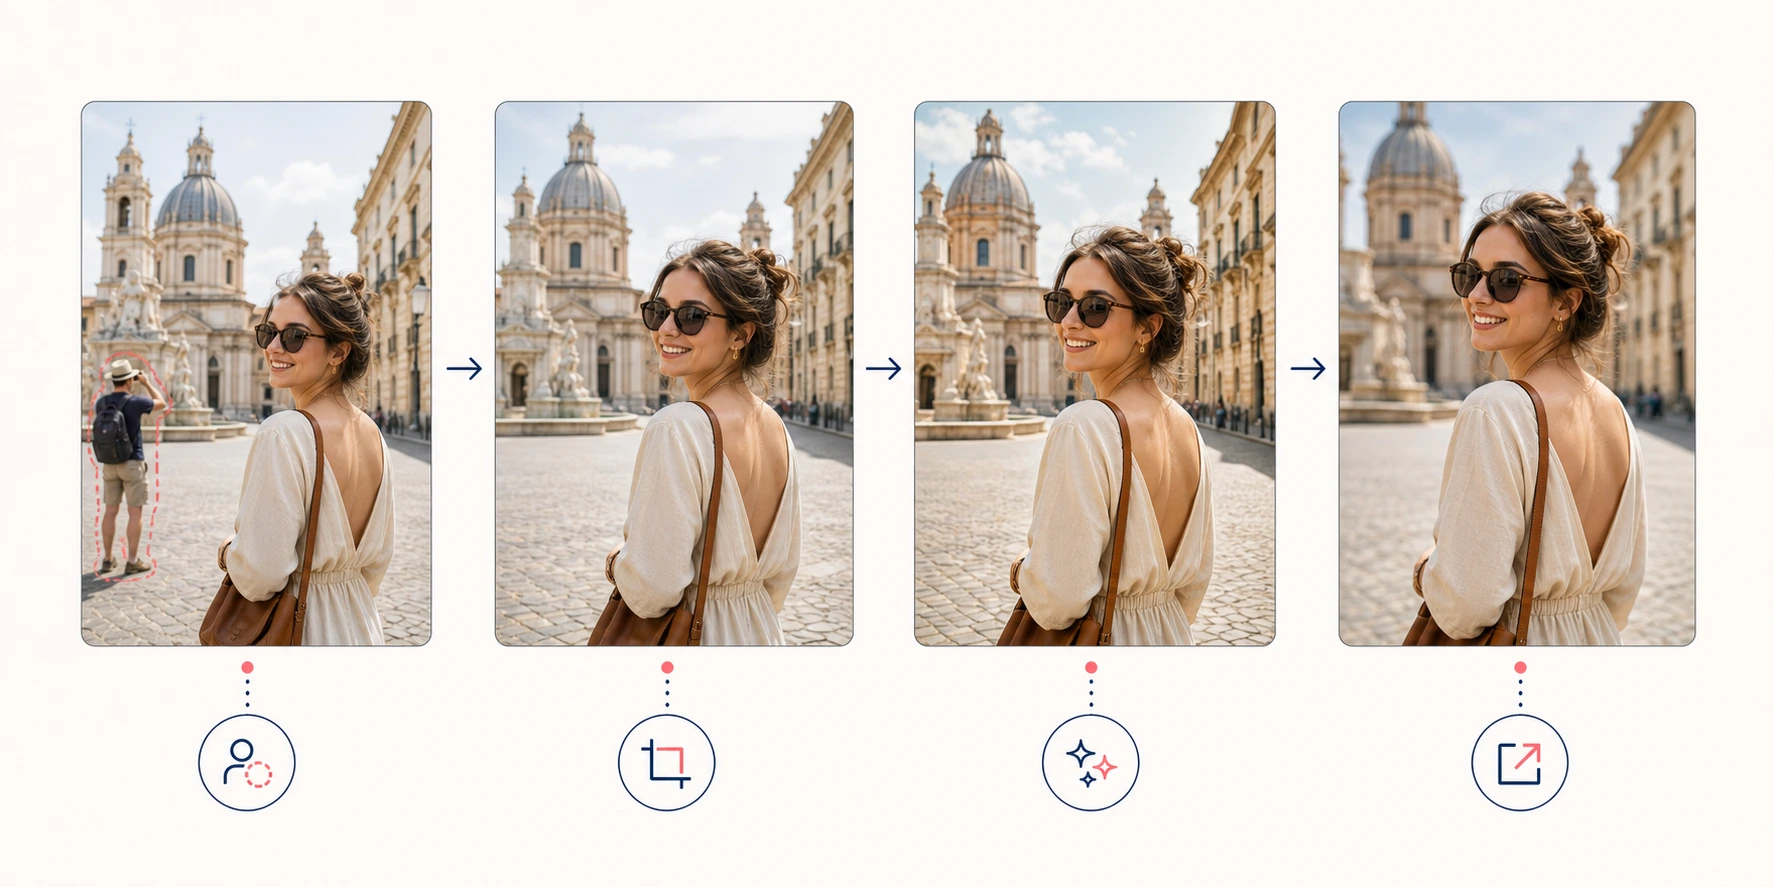
Different image problems should be handled in a deliberate order:
| Need | Recommended step |
|---|---|
| Remove a passerby, cable, bag, or distraction | Start with Magic Eraser |
| Reframe the cleaned composition | Use the Image Cropper |
| Improve general clarity after cleanup | Use the AI Photo Enhancer |
| Prepare a small image for a larger screen or print | Finish with the Image Upscaler |
| Reduce unwanted reflection or flash glare | Use the Remove Glare tool |
Removing distractions before enhancement prevents the sharpening stage from making unwanted people, compression blocks, and object edges more prominent.
Frequently Asked Questions
Can AI remove unwanted people automatically?
Yes. AI tools can reconstruct the area behind a selected person using the surrounding scene. Results are usually strongest when the person is isolated and the background contains visible repeating information.
How do I remove a person from a picture without Photoshop?
Use a browser-based people remover such as EzEnhancer Magic Eraser. Upload the photo, choose People mode, brush over the complete figure and connected shadow, process the edit, and inspect the result before downloading.
Why does the background look blurry after removing someone?
The selection may be too large, the source may be compressed, or the person may cover a unique background feature. Retry with a smaller mask and process individual people separately.
Can I remove a person who overlaps someone else?
Sometimes, but overlapping faces, hands, hair, and clothing raise the risk of changing the person you want to keep. Use a precise mask or switch to manual layer-based editing for important photos.
Should I enhance the image before or after removing people?
Usually remove people first. Enhancement can sharpen unwanted edges and compression artifacts, making them harder to reconstruct. Clean the scene, check the edit, then enhance or upscale the final image.
Can I remove people from an old or low-resolution photo?
Yes, but limited source detail makes reconstruction less predictable. Use the best available scan, keep the original file, remove distractions carefully, and upscale only after the cleanup is complete.
Final Takeaway
To clean unwanted people out of a picture without ruining the background, give the AI a focused task. Use the best original image, protect the main subject, select the complete unwanted person, include connected shadows, and work through the scene one person at a time.
A careful mask and a patient review matter more than a dramatic one-click promise. When the background is highly detailed or the person overlaps an important face, hand, or object, make a smaller pass or use manual editing.
Top 5 Remini Alternatives: Best Free AI Image Upscaler Tools
Discover the 5 best free and online Remini alternatives in 2026. Unblur faces, upscale photos, and restore images instantly directly in your web browser.
How to Replace an Object in a Photo with AI: 8 Use Cases
Learn how to replace an object in a photo with AI, with steps, prompts, and eight use cases for ecommerce, interior design, restaurants, fashion, and more.